This is the last article in the series where I describe the small improvements I made and publish the link to the github repository.
If you missed the previous article and you want to read them:
I ended my previous article by describing what improvements could be made. In this short time (there were holidays) I worked on
ccxt. Implemented the Binance class using the Binance APIs.AVNUIn the future, I am still interested in removing AVNU and creating a more robust infrastructure.
You can find the repository of StarkShift here. Development will continue on github and I will only write articles when there are interesting developments or features.
I just wanted to describe how an arbitrage bot works and show how easy it is to create a new one.
--- ## Building an Arbitrage Bot on Starknet: Part 2 - The bot Date: 2024-08-19 URL: https://lisot.to/posts/starknet-arbitrage-bot/ Tags: blockchain, starknet, mevThis article is part of a series on building an arbitrage bot between centralised (CEX) and decentralised (DEX) exchanges on Starknet.
In this article I will finally cover the bot implementation, explaining the
interfaces, the communication with the exchanges and the Arbitrage class.
The bot is written in Python 3.12 using asyncio. It makes extensive use of
coroutines and some of the features offered by Asyncio. If you not know how
asyncio works, you can start
here.
As I mentioned in my previous article, I decided to use
poetry as a dependency manager. One of its
features is automatically creating the project folder when poetry new is
executed. The folder looks like this:
.
├── Dockerfile
├── README.md
├── poetry.lock
├── pyproject.toml
├── starknet_arbitrage
│   ├── __main__.py
│   ├── arbitrage.py
│   ├── core
│   │   └── types.py
│   ├── exchange
│   │   ├── base.py
│   │   ├── cex
│   │   │   └── binance.py
│   │   └── dex
│   │       └── avnu.py
│   └── starknet.py
└── tests
    └── __init__.py
__main__.py loads the setting and starts the botarbitrage.py contains the logic of the botcore defines common typesexchange handles the communication between centralised, decentralised
exchanges and the botstarknet.py handles the communication between Starknet and the botThe module defines types and logic useful for the whole library. Currently, I
have only defined common types in core/types.py
@dataclass
class Token:
    name: str
    address: str = ""
    decimals: int = 18

    def __str__(self) -> str:
        return f"{type(self).__name__}(name={self.name})"


@dataclass
class Symbol:
    base: Token
    quote: Token

@dataclass
class Ticker:
    raw: dict
    bid: Decimal
    bid_amount: Decimal
    ask: Decimal
    ask_amount: Decimal


@dataclass
class Wallet:
    raw: dict
    token: Token
    amount: Decimal

    def __str__(self) -> str:
        return f"{type(self).__name__}(token={self.token}, amount={self.amount})"

    @staticmethod
    def empty(token: Token) -> Wallet:
        return Wallet({}, token, Decimal(0))


@dataclass
class Order:
    raw: dict
    symbol: Symbol
    amount: Decimal
    price: Decimal
    side: str
The names of the classes are rather self-explanatory. raw fields contain the
original message sent by the exchange. They can be used for debugging or
extracting exchange-dependent information, as required by AVNU.
Decimal objects provide
support for fast, correctly-rounded decimal floating-point arithmetic. Although
they are slower than float, they are a good compromise for avoiding the
floating- point errors that float suffers from.
Although centralised and decentralised exchanges are completely different services, with different features and different APIs, I want a unified interface so the bot can work easily. We are only interested in:
Based on this, the Exchange interface is defined as:
class Exchange:
    @abc.abstractmethod
    async def subscribe_ticker(self, symbol: Symbol, **_):
        """Subscribe to the ticker channel."""

    @abc.abstractmethod
    async def buy_market_order(self, symbol: Symbol, amount: Decimal, *args, **kwargs):
        """Insert a buy market order."""

    @abc.abstractmethod
    def receiver_queue(self) -> asyncio.Queue:
        """Return the queue containing the messages from the Exchange."""

    @abc.abstractmethod
    async def sell_market_order(self, symbol: Symbol, amount: Decimal, *args, **kwargs):
        """Insert a sell market order."""
The receiver_queue method returns a Queue containing the messages received
from the exchange. Remember that the bot connects to the exchanges using
websockets. There will be a continuous flow of messages, which will be parsed by
the class and added to the receiver_queue.
I decided to implement only two exchanges: Binance and AVNU. The latter is not a real DEX but an aggregator. However, it is useful because it offers an API that provides prices and quotes for all the DEXes implemented.
No need to introduce Binance. It is the centralised exchange with the highest
volume and market share. To handle the websocket,
ccxt is used. The Binance class defined in
exchange/cex/binance.py is a wrapper around the ccxt methods.
class Binance(Exchange):
    """Binance exchange."""

    def __init__(self, api_key: str, secret_key: str) -> None:
        self._exchange_handle = ccxt.pro.binance(
            {"apiKey": api_key, "secret": secret_key}
        )
        self._receiver_queue = asyncio.Queue()

    ...
As you can see, __init__ needs api_key and secret_key to authenticate in
the authenticated channel and to send orders. The class is very simple. The bot calls
subscribe_ticker, then ccxt sends the request to subscribe to the ticker
channel and _handle_ticker handles the messages.
    async def _handle_ticker(self, symbol: str):
        """Handle ticker messages and connection."""
        while True:
            msg = await self._exchange_handle.watch_ticker(symbol)

            ticker = Ticker(
                msg,
                Decimal(msg["info"]["b"]),
                Decimal(msg["info"]["B"]),
                Decimal(msg["info"]["a"]),
                Decimal(msg["info"]["A"]),
            )

            await self._receiver_queue.put(ticker)

    async def subscribe_ticker(self, symbol: Symbol, **_):
        """Subscribe to the ticker."""
        exchange_symbol = f"{symbol.base.name}{symbol.quote.name}"
        asyncio.create_task(self._handle_ticker(exchange_symbol))
The bot will also need to subscribe to the authenticated channel in the same way
as _fetch_ticker, so it can receive wallet updates.
The Binance websocket has one problem: it does not send initial snapshots of both, the balances and the ticker. For the ticker, this isn’t a big deal for active pairs, as an update is sent immediately. However, for the balances, it is an issue because an update is only sent when the balances change. This means an initial request for the balances is required.
    async def subscribe_balance(self, symbol: Symbol, **_):
        """Subscribe to the authenticated endpoint for balances.

        NOTE: Balances are filtered by `Symbol`.

        """
        exchange_symbol = f"{symbol.base.name}{symbol.quote.name}"
        await self._receiver_queue(
            await self._exchange_handle.fetchBalance(exchange_symbol)
        )

        asyncio.create_task(self._handle_balance(exchange_symbol))
The method of sending an order is as follows:
async def buy_market_order(
        self, symbol: Symbol, amount: Decimal, *_, **__
    ):
        """Insert a new buy market order."""
        exchange_symbol = f"{symbol.base.name}{symbol.quote.name}"

        order = await self._exchange_handle.create_order_ws(
            exchange_symbol, "market", "buy", float(amount), params={"test": True}
        )

        await self._receiver_queue(Order(
            order, symbol, Decimal(str(order.price)), Decimal(str(order.amount)), "buy"
        ))
As aforementioned, AVNU is not a real DEX, it is an aggregator. I use this protocol because its API provides prices and quotes from all supported exchanges. At the expense of higher fees, the bot can easily swap with 10 different DEXes.
There is only one problem with the API: it does not offer a websocket
connection, so the class needs to simulate it. Remember that I want to
abstract this problem to Arbitrage. The bot expects to receive a stream of
messages, not to make requests.The main idea is to create coroutines that make
requests every $$N$$ seconds. But first let’s define some useful constants for
the class:
ETH = Token(
    "ETH", "0x049d36570d4e46f48e99674bd3fcc84644ddd6b96f7c741b1562b82f9e004dc7", 18
)


URLS = {
    "base": "https://starknet.api.avnu.fi",
    "quotes": "swap/v2/quotes",
    "prices": "swap/v2/prices",
    "sources": "swap/v2/sources",
    "build": "swap/v2/build",
}
ETH is a Token object representing the Ethereum token on Starknet, while
URLS is a dictionary containing the AVNU API url and endpoints. AVNU is
defined as:
class AVNU(Exchange):
    """AVNU exchange."""

    def __init__(self, account: Account, balance: Symbol) -> None:
        self._account = account
        # Fetch available dexes
        response = requests.get(f"{URLS['base']}/{URLS['sources']}")
        available_dexes = [
            dex["name"] for dex in response.json() if dex["type"] == "DEX"
        ]
        available_dexes.append("lastPrice")

        self._last_prices = {dex: Decimal("0") for dex in available_dexes}
        self._receiver_queue = asyncio.Queue()

        asyncio.create_task(self._fetch_balance(balance))
As you can see, the class starts by fetching the exchanges supported by AVNU and
initialising self._last_prices. The request is synchronous because:
__init__ cannot be asynchronous. This is a limitation of Python, the class
initialiser cannot be marked as asyncFinally, it creates the coroutine for _fetch_balance which fetches the initial
account balances. The method is defined as:
    async def _fetch_balance(self, symbol: typing.Optional[Symbol] = None):
        tokens = [ETH] if symbol is None else [symbol.base, symbol.quote]

        for token in tokens:
            logger.debug(f"Fetching {token.address} balance")
            amount = await self._account.get_balance(token.address)
            await self._receiver_queue.put(
                Wallet({"amount": amount}, token, Decimal(amount) / 10**token.decimals)
            )
Let’s see how subscribe_ticker is implemented:
    async def subscribe_ticker(self, symbol: Symbol, amount: decimal.Decimal, **_):
        asyncio.create_task(self._handle_quotes(symbol, amount))

    async def _handle_quotes(
        self,
        symbol: Symbol,
        amount: decimal.Decimal,
    ):
        url = f"{URLS['base']}/{URLS['quotes']}"
        params_sell = {
            "sellAmount": hex(amount * 10 ** int(symbol.base.decimals)),
            "sellTokenAddress": symbol.base.address,
            "buyTokenAddress": symbol.quote.address,
        }
        params_buy = {
            "sellAmount": hex(amount * 10 ** int(symbol.base.decimals)),
            "sellTokenAddress": symbol.base.address,
            "buyTokenAddress": symbol.quote.address,
        }

        async with aiohttp.ClientSession() as session:
            while True:
                logger.debug("Fetching quotes")
                # We need to make two requests because a call to `/quotes` also
                # sets the swap order. Therefore, if we want to buy `base` from
                # `quote` we need the opposite ordeer (and a new `quoteId`)
                resp_sell, resp_buy = await asyncio.gather(
                    session.get(url, params=params_sell),
                    session.get(url, params=params_buy),
                )
                entries_sell, entries_buy = await asyncio.gather(
                    resp_sell.json(), resp_buy.json()
                )

                # `entries_sell` is a list with one element
                entry = entries_sell[0]

                quote_amount = decimal.Decimal(int(entry["buyAmount"], 16))
                quote_amount = quote_amount / (10**symbol.quote.decimals)
                price = quote_amount / amount

                if self._last_prices["lastPrice"] != price:
                    self._last_prices["lastPrice"] = price

                    entry["sellId"] = entry["quoteId"]
                    entry["buyId"] = entries_buy[0]["quoteId"]
                    ticker = Ticker(entry, price, amount, price, amount)

                    await self._receiver_queue.put(ticker)

                await asyncio.sleep(1)
The methods are simple. The first creates a coroutine to _handle_quotes, while
the second does the actual work . Rather than using the prices endpoint,
quotes is used. Not only to get the best price, but to ask to AVNU to prepare
the swap for us. The
endpoint
builds a route to get the best swap and assigns a unique quoteId to each
request. The id can be used later when the class sends the request to build the
swap transaction. Two requests are made because it is not possible to change the
order of the buy/sell token addresses while the transaction is being built.
The method continues with parsing the outputs, calculating the price, storing
the quoteId and adding the Ticker to the receiver_queue.
The last methods are for sending the orders:
    async def buy_market_order(
        self,
        symbol: Symbol,
        amount: Decimal,
        ticker: Ticker,
        slippage: Decimal = Decimal("0.01"),
    ):
        """Insert a buy market order."""
        url = f"{URLS['base']}/{URLS['build']}"

        payload = {
            "slippage": str(slippage),
            "takerAddress": hex(self._account.address),
            "quoteId": ticker.raw["quoteId"],
            "includeApprove": True,
        }

        # FIXME: Share session with `handle_prices_quotes`
        async with aiohttp.ClientSession() as session:
            response = await session.post(url, json=payload)
            resp_calls = await response.json()

            # `resp_calls` is a dict containing `chainId` and `calls` keys. A
            # call is a dict containing `contractAddress, entrypoint` and
            # `calldata`. Values are hexed or string (the selector)
            calls = [
                Call(
                    int(call["contractAddress"], 16),
                    get_selector_from_name(call["entrypoint"]),
                    [int(call_value, 16) for call_value in call["calldata"]],
                )
                for call in resp_calls["calls"]
            ]

            logger.info("sending order")
            transaction_hash = await self._account.execute_v3(calls, auto_estimate=True)
            await self._wait_txn(
                transaction_hash.transaction_hash, symbol, amount, ticker, "buy"
            )
At this stage build endpoint is used to build the swap transaction. In the
future I would like to remove AVNU and swap directly on the DEXes.
The quoteId is used to request AVNU to build the swap and return the
transaction calldata. The response is prepared for
Starknetjs and not for the python version.
contractAddress and calldata need to be converted to int while
entrypoint is a human readable string and needs to be converted into the
selector (i.e. from approve to
0x04270219d365d6b017231b52e92b3fb5d7c8378b05e9abc97724537a80e93b0f).
The final steps are to broadcast the transaction and wait for the sequencer to
validate it. Once validated, the Order message is added to the
receiver_queue and the new balances are fetched:
    async def _wait_txn(
        self,
        transaction_hash: int,
        symbol: Symbol,
        amount: Decimal,
        ticker: Ticker,
        side: str,
    ):
        """Wait until transaction is confirmed. After create the order and update the balance."""
        await self._account.client.wait_for_tx(transaction_hash)

        order = Order(
            {"transaction_hash": transaction_hash},
            symbol,
            amount,
            # NOTE: `ask` and `bid` are the same
            ticker.ask,
            side,
        )
        await self._receiver_queue.put(order)

        asyncio.create_task(self._fetch_balance(symbol))
In the previous sections, I defined the Exchange interface and described how I
implemented Binance and AVNU. In this section, I will describe the last
component of the bot: the Arbitrage class, the most important one. It is
responsible for determining if there is a profit and attempting to take it.
class Arbitrage:
    def __init__(
        self,
        exchanges: list[Exchange],
        symbol: Symbol,
        spread_threshold: Decimal,
        trade_amount: Decimal,
        min_trade_amount: Decimal,
    ):
        self._exchanges = exchanges
        self._symbol = symbol
        self._threshold = spread_threshold
        self._queue: asyncio.Queue[tuple[Any, Exchange]] = asyncio.Queue()
        self._trade_amount = trade_amount
        self._min_trade_amount = min_trade_amount
It requires a list of Exchange, the Symbol on which to trade,
spread_threshold which indicates the profit threshold, and trade_amount and
min_trade_amount which define the trading range.
The more observant will have noticed that Arbitrage requires a list of
Exchange rather than a single CEX and DEX. The class is capable of iterate
over multiple exchanges and it does not care whether the exchanges are CEXes or
DEXes.
Arbitrage defines two utility functions, _initialize and _merge_queues
    async def _initialize(self):
        for exchange in self._exchanges:
            await exchange.subscribe_ticker(
                self._symbol, amount=int(self._trade_amount)
            )
            queue = exchange.receiver_queue()
            asyncio.create_task(self._merge_queues(queue, exchange))
As the name suggests, _initialize is called to subscribe to the tickers and to
merge the queues into a single one by calling _merge_queues:
    async def _merge_queues(self, queue: asyncio.Queue, ex: Exchange):
        while True:
            val = await queue.get()
            await self._queue.put((val, ex))
The functions for calculating the spread and the amount to be swapped are quite simple:
    def _calculate_spread(self, ask: Decimal, bid: Decimal) -> Decimal:
        numerator = bid - ask
        return numerator / bid

    def _calculate_amount(
        self,
        ask: Ticker,
        bid: Ticker,
        wallet_ask: Decimal,
        wallet_bid: Decimal,
    ) -> Decimal:
        """Return the amount we can trade."""
        amount = min(self._trade_amount, ask.ask_amount, bid.bid_amount)
        # Check wallets have enough balance
        # NOTE: `wallet_ask` is the quote token balance. Convert in base
        amount = min(amount, wallet_bid, wallet_ask * ask.ask)
        return amount
As you can see, _calculate_amount, follows the formula described in Step 3:
Sending orders.
Remember that wallet_ask is the total amount of available quote tokens. A
base conversion is needed to compare them.
Finally, the last and the most interesting method of the class. The method waits for messages from the exchanges and it decides to send the order if there is a profit.
    async def run(self):
        # Subscribe to the tickers and merge the queues
        await self._initialize()

        best_bid = Ticker({}, Decimal("-INFINITY"), Decimal(0), Decimal(0), Decimal(0))
        best_ask = Ticker({}, Decimal(0), Decimal(0), Decimal("INFINITY"), Decimal(0))
        exchange_ask = exchange_bid = self._exchanges[0]

        wallets = {
            exchange: {
                self._symbol.base.name: Wallet.empty(self._symbol.base),
                self._symbol.quote.name: Wallet.empty(self._symbol.quote),
            }
            for exchange in self._exchanges
        }

        while True:
            msg, exchange = await self._queue.get()

            match msg:
                case Wallet():
                    wallets[exchange][msg.token.name] = msg
                case Order():
                    logger.info(
                        f"{exchange} order executed. {msg.side}: {msg.amount} at {msg.price}"
                    )
                case Ticker():
                    # We want to buy at the lowest price
                    if msg.ask <= best_ask.ask:
                        best_ask = msg
                        exchange_ask = exchange

                    # We want to sell at the highest price
                    if msg.bid >= best_bid.bid:
                        best_bid = msg
                        exchange_bid = exchange

                    # Same exchange, skip
                    if exchange_bid == exchange_ask:
                        continue

                    spread = self._calculate_spread(
                        best_ask.ask,
                        best_bid.bid,
                    )
                    ba = dataclasses.replace(best_ask)
                    ba.raw = exchange_ask
                    bb = dataclasses.replace(best_bid)
                    bb.raw = exchange_bid

                    logger.debug(
                        f"spread: {spread} best ask: {ba.ask} best bid: {bb.bid}"
                    )
                    if spread >= self._threshold:
                        logger.info(f"{spread} above the threshdold")
                        amount = self._calculate_amount(
                            best_ask,
                            best_bid,
                            wallets[exchange_ask][self._symbol.base.name].amount,
                            wallets[exchange_bid][self._symbol.quote.name].amount,
                        )

                        if amount < self._min_trade_amount:
                            continue

                        logger.debug(
                            f"{exchange_ask}: buy: {amount} price: {best_ask.ask}"
                        )
                        logger.debug(
                            f"{exchange_bid}: sell: {amount} price: {best_bid.bid}"
                        )

                        await asyncio.gather(
                            exchange_ask.buy_market_order(
                                self._symbol, amount, best_ask
                            ),
                            exchange_bid.sell_market_order(
                                self._symbol, amount, best_bid
                            ),
                        )
The bot is almost ready. What is missing is loading the config and the main
function. The config is in an .env file and is read using the
dotenv library. Config is
responsible for loading and validating the configuration.
class Config:
    REQUIRED_KEYS = {
        "BASE_ADDR",
        "BASE_DECIMALS",
        "BASE",
        "QUOTE_ADDR",
        "QUOTE_DECIMALS",
        "QUOTE",
        "API_KEY",
        "SECRET_KEY",
        "SIGNER_KEY",
        "NODE_URL",
        "SPREAD_THRESHOLD",
        "MAX_AMOUNT_TRADE",
    }

    def __init__(self, config: dict) -> None:
        for key in self.REQUIRED_KEYS:
            if key not in config:
                raise ValidationError(f"Missing `{key}`")

        self.base = Token(
            config["BASE"], config["BASE_ADDR"], int(config["BASE_DECIMALS"])
        )
        self.quote = Token(
            config["QUOTE"], config["QUOTE_ADDR"], int(config["QUOTE_DECIMALS"])
        )
        self.symbol = Symbol(self.base, self.quote)

        self.api_key = config["API_KEY"]
        self.secret_key = config["SECRET_KEY"]

        self.node_url = config["NODE_URL"]
        self.account_address = config["ACCOUNT_ADDRESS"]
        self.signer_key = config["SIGNER_KEY"]

        self.spread_threshold = Decimal(config["SPREAD_THRESHOLD"])
        self.max_amount_trade = Decimal(config["MAX_AMOUNT_TRADE"])
        self.min_amount_trade = Decimal(config["MIN_AMOUNT_TRADE"])
Finally, the main function:
async def main():
    # Bot settings
    logger = logging.getLogger("bot")
    logger.setLevel(logging.DEBUG)
    logger.addHandler(RichHandler())
    # Load config
    config = {**dotenv_values(".env"), **os.environ}
    config = Config(config)

    # Exchange initialisation
    logger.debug("Connecting to starknet...")
    chain = Starknet(config.node_url)
    account = chain.get_account(config.account_address, config.signer_key)
    logger.debug("Connecting to AVNU...")
    avnu = AVNU(account, config.symbol)

    logger.debug("Connecting to binance...")
    binance = Binance(config.api_key, config.secret_key)

    # Run bot
    logger.debug("All setup, running bot...")
    bot = Arbitrage(
        [binance, avnu],
        config.symbol,
        config.spread_threshold,
        config.max_amount_trade,
        config.min_amount_trade,
    )
    await bot.run()


asyncio.run(main())
The bot explained is very basic and there is room for many improvements. Here are a few:
ccxt.While the library is great for prototyping, it introduces a lot
of unnecessary requests and is slow. It can be replaced by calling the Binance
API.AVNU. Although is great for its API, the bot swaps at the best rates
while it should swap between the best and worst prices.auto_estimate when signing the transaction.As I mentioned in my previous articles of the series there is a group to discuss MEV on Starknet. If you are interested in the argument, want to discuss or have some interesting information, you can find me there. Feel free to join the group.
--- ## Building an Arbitrage Bot on Starknet: Part 1 - The basics Date: 2024-08-08 URL: https://lisot.to/posts/starknet-arbitrage-basics/ Tags: blockchain, starknet, mevThis article is part of a series on building an arbitrage bot between centralised (CEX) and decentralised (DEX) exchanges on Starknet.
In this article I will cover the functionalities of the bot, explaining its functionality, how it works, the library used, and the underlying mathematics.
There are many resources describing what an arbitrageur is and what arbitrage bots do. However, I will try to give my own perspective on the subject.
In a market where many different entities offer services for the exchange of assets, these assets may have different prices, even if they are the same. This is because each service operates separately and users determine the price through their behaviour.
Popular services attract more users, which means more liquidity and a more stable price. On the other hand, services with less liquidity may have a more volatile price. Fewer trades also update the price more slowly. These differences are known as market inefficiencies. An arbitrageur is an entity that tries to make a profit from these inefficiencies by buying the asset at a lower price and selling it at a higher price.
Arbitrageurs do not exist only in the crypto space but are also a fundamental part of traditional finance.
In the blockchain space, we have two main types of exchanges: centralised and decentralised. A centralised exchange (CEX) is basically a trading platform run by one company that lets people buy and sell crypto assets. They usually have an order book where users can enter their orders and the engine will execute them.
A decentralised exchange (DEX) lives on a blockchain in the form of smart contracts, sometimes regulated by a DAO. They are a backbone of decentralised finance (DeFi). Automated Market Makers (AMMs) are a type of DEX that use a mathematical formula to determine the price. Unlike CEXes, AMMs consist of liquidity pools, typically with two or three crypto assets. The most popular liquidity pools are Uniswap V2 that follows the formula $$x * y = k$$ or Uniswap V3 with concentrated liquidity.
DeFi products are not just AMMs. The most famous order book product is probably DyDx.
An arbitrage bot has two big risks:
The risk is not related to the bot, but with the tokens themselves. An arbitrage bot is not interested in the value of the token it is trading. The problem lies in the value of the tokens, if any go down in value, the profits will also go down, reducing the profitability of the bot. The only solution is not to trade very risky pairs or to sell the profits immediately.
Trades are not atomic, so one of them may be executed at a difference price or fail. In addition, centralised exchanges may also have hidden orders or may not execute (unless the market type is not selected).
For DEXes it is even more complicated:
minPrice (or the slippage is higher than the one set).The solution is to build an atomic arbitrage bot that takes the opportunity opportunity in a single transaction and if it fails, the swaps are not executed. Fortunately, as I wrote in the previous article, Starknet does not have these problems.
Before describing how the bot works, let’s look at some definitions. If you are already familiar with them skip this section.
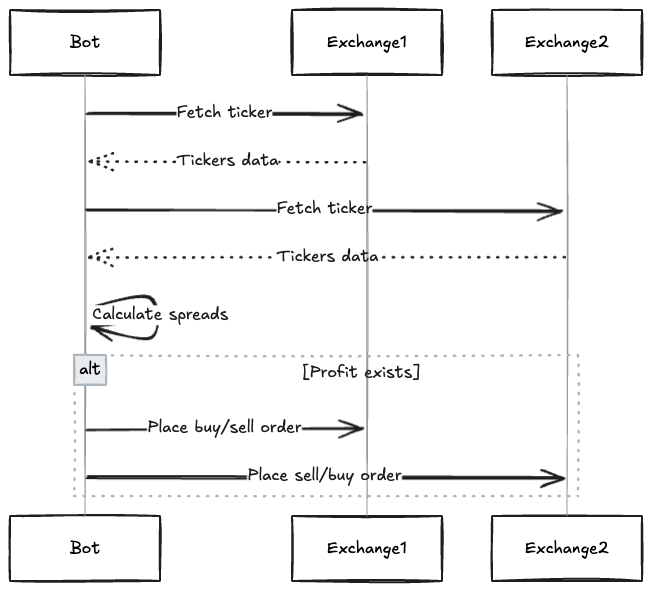
The bot consists of several steps:
Here is a sequence diagram showing an interaction of the bot
The bot needs to get the token prices from the exchange all the time. With centralised exchanges, there is an endpoint called ticker that returns a message like this:
{
  "symbol": "BTCUSDT",
  "priceChange": "-1067.94000000",
  "priceChangePercent": "-1.619",
  "weightedAvgPrice": "66057.25597271",
  "prevClosePrice": "65957.82000000",
  "lastPrice": "64889.88000000",
  "lastQty": "0.00109000",
  "bidPrice": "64889.88000000",
  "bidQty": "3.24493000",
  "askPrice": "64889.89000000",
  "askQty": "0.16658000",
  "openPrice": "65957.82000000",
  "highPrice": "66849.24000000",
  "lowPrice": "64632.00000000",
  "volume": "20494.74928000",
  "quoteVolume": "1353826899.28544630",
  "openTime": 1722370827899,
  "closeTime": 1722457227899,
  "firstId": 3709477216,
  "lastId": 3711014970,
  "count": 1537755
}
We are only interested in the price and quantity of the bid and ask (bidPrice,
bidQty, askPrice, askQty from the example).
AMMs work in a different way and they do not produce a ticker, so we need to simulate it. There are two ways we can get the price from a pool:
The latter is better because it is more precise. In an AMM the amount you are swapping affects the price. The higher the quantity, the more you unbalance the pool (and the less you get), and the more the price changes. Thus, we can ask to the pool to simulate a trade, calculate the price and then simulate the ticker:
  initial_amount = 1 * 10**18 # amount that we are interested to swap
  amount_out = pool.swap(initial_amount) # the pool returns the swapped amount
  price = amount_out / initial_amount
  # build a fake ticker message
  ticker = {
    "bidPrice": price,
    "bidAmont": initial_amount,
    "askPrice": price,
    "askAmont": initial_amoun,
  }
A fundamental concept to know is that prices are ALWAYS IN BASE. For this reason, in the snippet, bid and ask are the same.
Once the tickers are fetched, we need to find the best bid and ask among them. An important thing to understand is that we are trading against these values. This mean that we will sell at the best bid and buy at the best ask.
If we only trade on two exchanges all we need to do is compare the two tickers and get the best amounts. However, with multiple exchanges, the formula is more general. Let $$N$$ be the number of exchanges we use, $$bid_i,\ ask_i$$ $$i \in N$$ the bid and ask of exchange $$i$$. The $$bestBid$$ and $$bestAsk$$ are defined as
[ bestBid = \max(bid_{1…N}) ]
[ bestAsk = \min(ask_{1…N}) ]
Instead of the ticker, the order book gives us much more information about how much liquidity there is in the pair. This information can be useful in later steps when the bot has to decide on the size of the orders.
The decision to use the ticker is because the logic around order sizing is simple: given a predefined amount, the bot tries to create an order with that amount. In addition, when a trade is made, the ticker is updated and, if the opportunity is still there, we can continue with our swaps.
Once the bot has fetched best bid and ask, it can proceed to calculate the spreads. As I wrote in terminology, the spread is the difference between the bid/ask of one exchange and the ask/bid of the other. Let’s say $$A$$ and $$B$$ are two different exchanges, the spread is:
[ spread = Bid_{A} - Ask_{B} ][ spread% = \frac{spread}{Bid_{A}} ]
Two spreads are calculated, one for each bid/ask side. If one of the spreads is $$> 0$$ or greater than a threshold, the bot moves to the next step: sending the orders.
At this point we know there is an opportunity with and there is a profit to be made. We smell 💵 💵 money 💵 💵. The bot needs to send the two orders to the exchanges.
For the centralised exchange, we will send a MARKET. For the DEX, we will
build a transaction with the swap to do. As I mentioned in my previous
article, in Starknet
transactions are executed immediately so we do not need to wait for the new
block to be mined.
But what is the order size? The strategy is very simple and consists of to trade a pre-defined amount. However, the trade may not be successful for two reasons:
We can solve the problem with the following formula. Let $$k$$ be the amount we want to swap, $$ask$$ the price of ask, $$amount_{ask}$$ the maximum amount we can trade at $$ask$$ price and $$wallet_{ask}$$ are the funds available on the exchange. $$bid$$, $$amount_{bid}$$ and $$wallet_{bid}$$ are defined in the same way. Therefore, the maximum value $$A$$ we can trade is:
[ A = \min(k,\ ask,\ bid,\ wallet_{bid},\ wallet_{ask} * ask) ]
Once the value to swap has been determined, the bot sends the orders, waits for the response and starts again from the first step.
I chose Python to develop the bot. For this type of bot, a faster language like Rust is not needed because the bottleneck is the latency of the exchanges. Because Python is a high-level language, we can develop much faster, and you do not have to worry about things like floating-point notation or big numbers.
As a dependency manager I use poetry
$ poetry new stark-arbitrage
And install the dependencies
$ poetry add python-dotenv rich ccxt starknet-py
Note that starknet-py requires additional external packages. See
Installation
for more information. The library is required to connect to Starknet and
retrieve account balances, and to sing and broadcast the transaction.
The centralised exchange that we will use is Binance through ccxt. For the decentralised exchange we will use AVNU to get the prices and to swap.
Ccxt (CryptoCurrency eXchange Trading Library) is a cryptocurrency trading library with support for many exchange markets, including Binance. The library is multi-language (JS, Python, PHP and C#) and provides a unified API across exchanges.
We are interested in the pro version because it offers support for websocket.
AVNU is a decentralised exchange protocol (a dex aggregator) designed to provide the best execution. The service has a nice API that returns the price and a simulated price (in this case it provides the best route for our trade) for all supported exchanges.
We will use AVNU to get the pool prices and ask it to create the transaction, which we will then sign and broadcast.
This article ends the long initial explanation on how Starknet and an arbitrage bot works. In the next article I will start to explain how to develop the steps described in the previous sections.
As I mentioned in my first article of the series there is a group to discuss MEV on Starknet. If you are interested in the argument, want to discuss or have some interesting information, you can find me there. Feel free to join the group.
--- ## Building an Arbitrage Bot on Starknet: Part 0 - Understanding the Fundamentals Date: 2024-07-18 URL: https://lisot.to/posts/starknet-arbitrage-fundamentals/ Tags: blockchain, starknet, mevThis article is part of a series on building an arbitrage bot between centralised (CEX) and decentralised (DEX) exchanges on Starknet.
We’ll explore Starknet’s architecture, focusing on elements crucial for arbitrage: the sequencer system and transaction lifecycle.
Starknet is a permissionless Layer 2 solution for Ethereum that uses zero-knowledge rollups (zk-rollups) to enhance scalability and security. Unlike optimistic rollups, Starknet’s approach allows for faster transaction finality and enhanced security. Key features include:
Here’s how Starknet works:
This process ensures transparency and security while leveraging the scalability benefits of Layer 2 technology. Starknet consists of two specialised actors: sequencers and provers. In this article, we will focus on the sequencers.
Sequencers are the backbone of the Starknet network, similar to Ethereum’s validators. While validators ensure network security, sequencers in Starknet provide transaction capacity. They serve as the access point for users to interact with the chain, necessitating high reliability and availability.
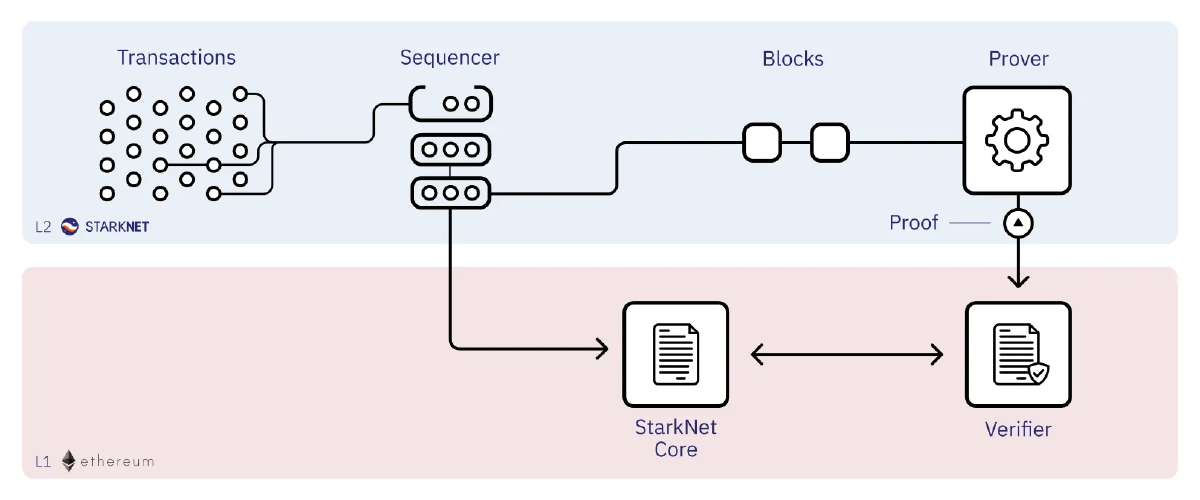
Sequencers play a crucial role in Starknet’s operation, following a systematic approach to transaction processing:
Sequencers follow this systematic method of processing transactions:
Once sequencers complete these steps, provers take over to generate cryptographic proofs of these blocks, which are then submitted to Ethereum for final verification.
Although there are plans to decentralise Starknet (here and here), the current centralised sequencer model provides us with two interesting features: efficient transaction ordering and predictable transaction execution.
The sequencer operates on a First-Come-First-Serve (FCFS) basis, processing transactions as they are received. This eliminates the need for mempool monitoring and gas price competition, as the first transaction sent is the first to be processed. In Starknet, it is all about being first.
Understanding the sequencer’s role and the FCFS model is crucial for arbitrage bot developers. The FCFS model shifts the focus from gas price optimization to being the first to submit a transaction, fundamentally changing arbitrage strategies on Starknet compared to other blockchain networks.
Starknet implements block production limits to ensure network stability and efficiency. Blocks are typically created every ~6 minutes or when specific thresholds are met. For the most current information on these limits, refer to the official Starknet Current Limits guide.
To better understand the execution of transactions within the sequencer, let’s examine the transaction lifecycle. There are three different types of transactions:
INVOKE used for calling an existing function in a contractDECLARE used for declaring new contract classes and activating new contract
instancesDEPLOY_ACCOUNT used for deploying new account contracts in smart wallets.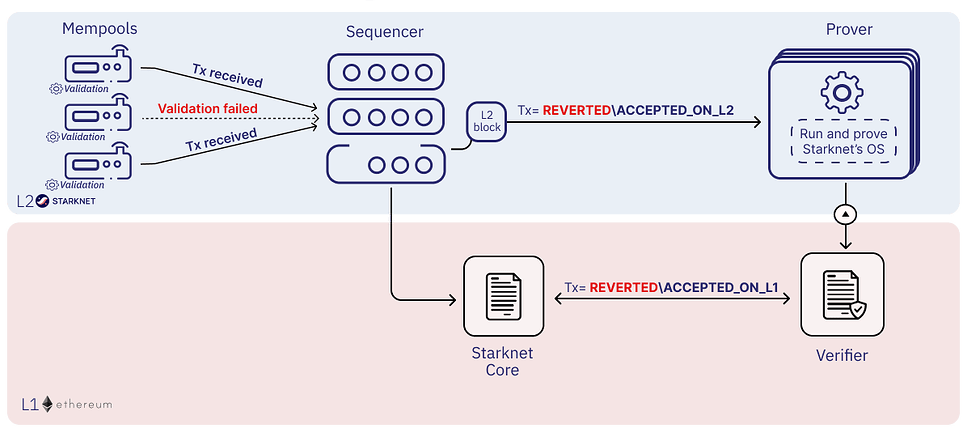
At a high level, the Starknet transaction flow is as follows:
RECEIVED and added to the mempool__validate__ function is called (or __validate_declare__, __validate_deploy__ for respective transaction type) to ensure that the
transaction is validACCEPTED ON L2. If a transaction fails during
execution, the status is set to REVERTED. Otherwise, the status is SUCCESSED.Why are these two aspects important to our arbitrage bot? While I was writing this article explaining their importance, Starknet made a tweet that answer the question perfetcly.
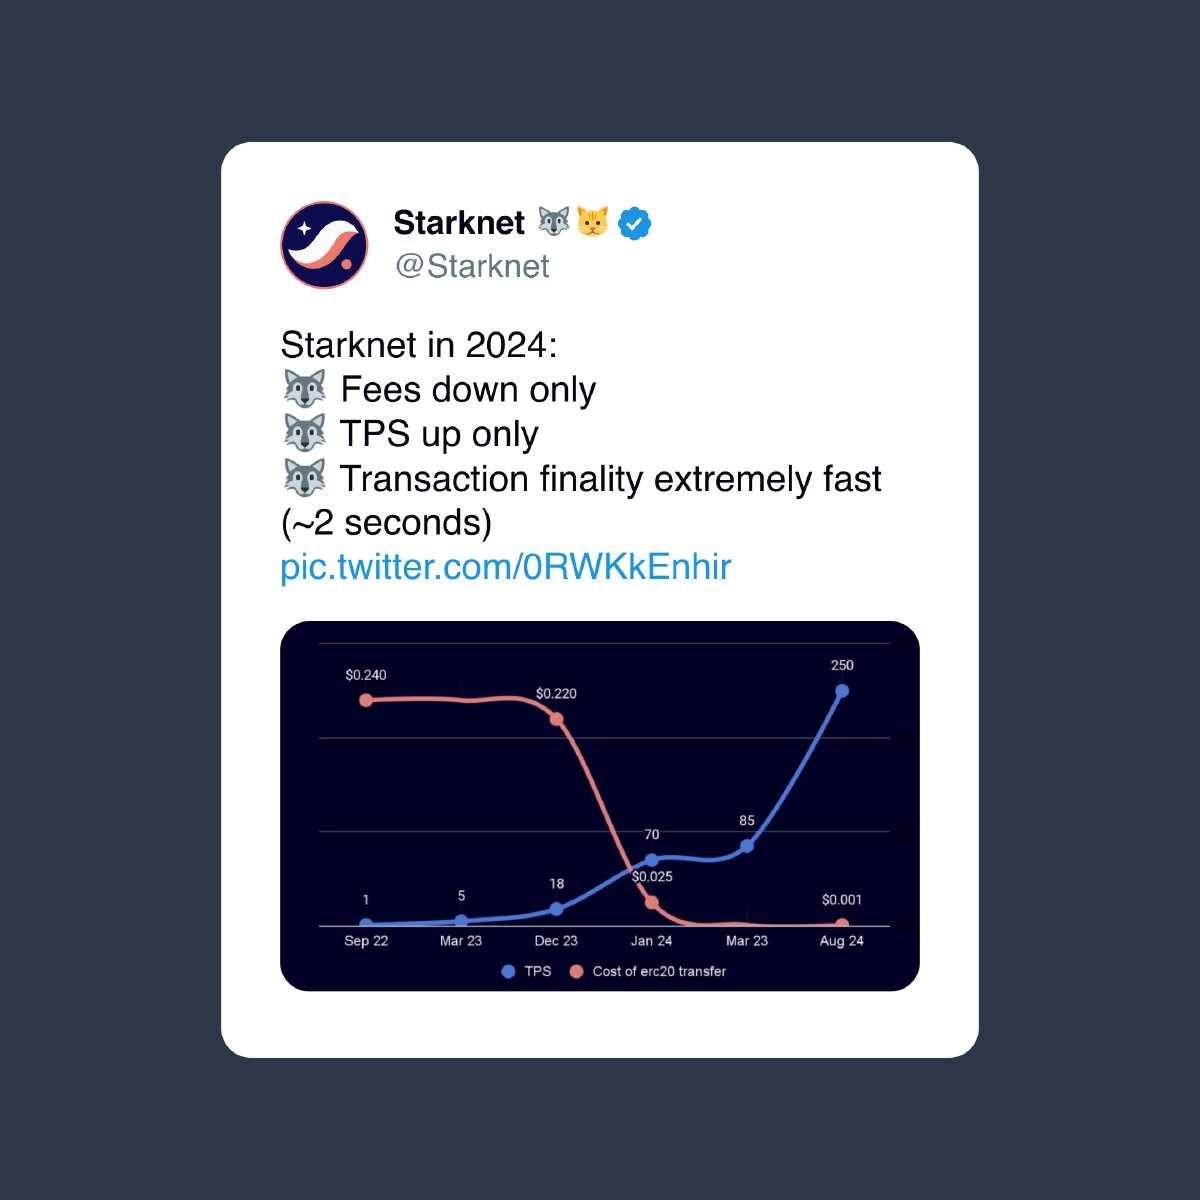
The answer is in “transaction finality extremely fast”. Although the tweet uses the wrong term, in Starknet finality occurs when the prover generates the block proof and publishes it on Ethereum. Validity, on the other hand, is when the sequencer builds the block. The ~2 seconds can be seen as fast validity.
But how is this possible? How can we have “finality” in ~2 seconds when a block is generated every ~6 minutes? The answer lies in stage 4 of the transaction lifecycle or point 2 of the sequencer. After execution, the sequencer updates the state of the chain. Because the sequencer is centralised and operate on a FCFS basis, it can ensure that the transaction order is preserved, allowing the chain state to be updated immediately. Block creation is a formality and only useful for the provers.
This is very important for us because it means we can completely ignore the mempool. We do not need to check it for pending swaps since the chain state has already been updated. But Matteo, are you 100% sure? Let’s follow the motto “Don’t trust, verify” and check if what I wrote is true.
I will illustrate this with two examples: first, the creation of an account, and second, a simple swap on Ekubo.
Once we have created the signer and generated the account we need to fund it for
deployment. The address of the account is
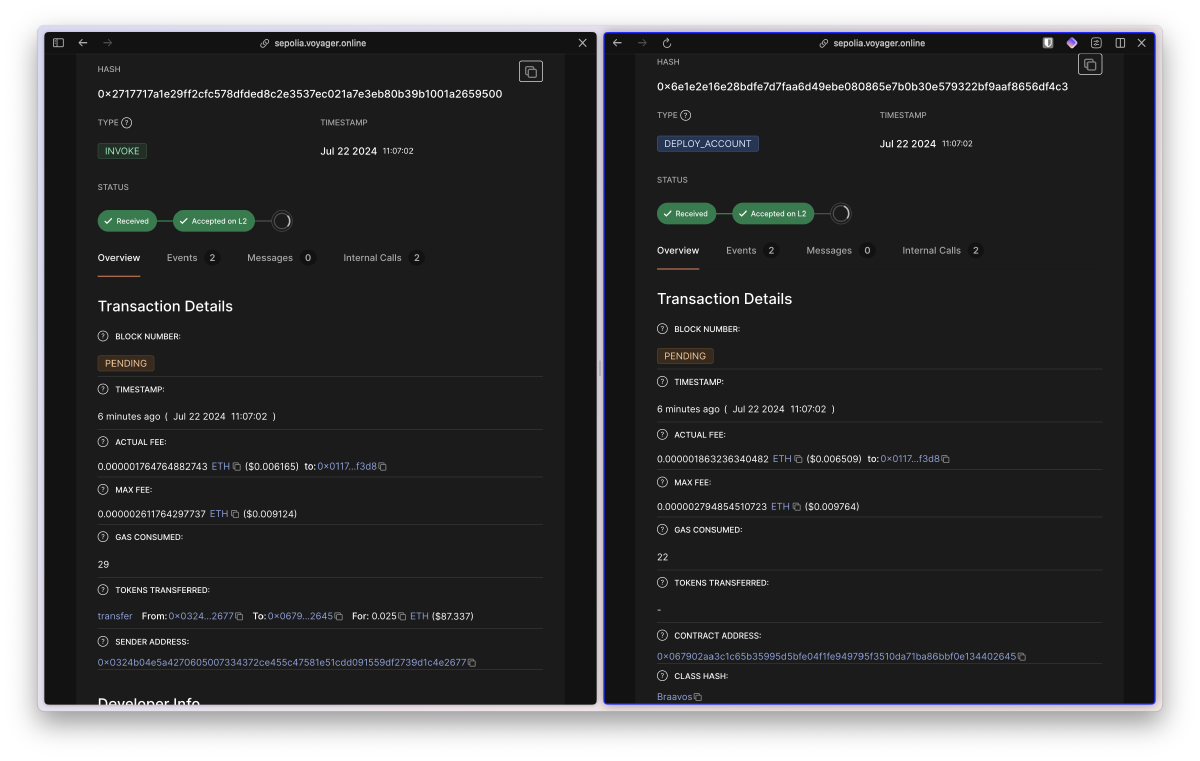
0x067902aa3c1c65b35995d5bfe04f1fe949795f3510da71ba86bbf0e134402645.
> starkli balance 0x067902aa3c1c65b35995d5bfe04f1fe949795f3510da71ba86bbf0e134402645 --network sepolia
0.000000000000000000
After the faucet
> starkli balance 0x067902aa3c1c65b35995d5bfe04f1fe949795f3510da71ba86bbf0e134402645 --network sepolia
0.025000000000000000
And deploy
> starkli account deploy account3.json --keystore keystore3.json
The estimated account deployment fee is 0.000001863236340482 ETH. However, to avoid failure, fund at least:
    0.000002794854510723 ETH
to the following address:
    0x067902aa3c1c65b35995d5bfe04f1fe949795f3510da71ba86bbf0e134402645
Press [ENTER] once you've funded the address.
Account deployment transaction: 0x06e1e2e16e28bdfe7d7faa6d49ebe080865e7b0b30e579322bf9aaf8656df4c3
Waiting for transaction 0x06e1e2e16e28bdfe7d7faa6d49ebe080865e7b0b30e579322bf9aaf8656df4c3 to confirm. If this process is interrupted, you will need to run `starkli account fetch` to update the account file.
Transaction not confirmed yet...
Transaction not confirmed yet...
Transaction 0x06e1e2e16e28bdfe7d7faa6d49ebe080865e7b0b30e579322bf9aaf8656df4c3 confirmed

>starkli balance 0x067902aa3c1c65b35995d5bfe04f1fe949795f3510da71ba86bbf0e134402645 --network sepolia
0.024998136763659518
From Voyager you can see that the transactions have been executed, the chain status has been updated and they are in the pending block.
For this example we swap STRK for ETH using Ekubo. As you
can see before the swap we have 20.0 STRK tokens.

Swap
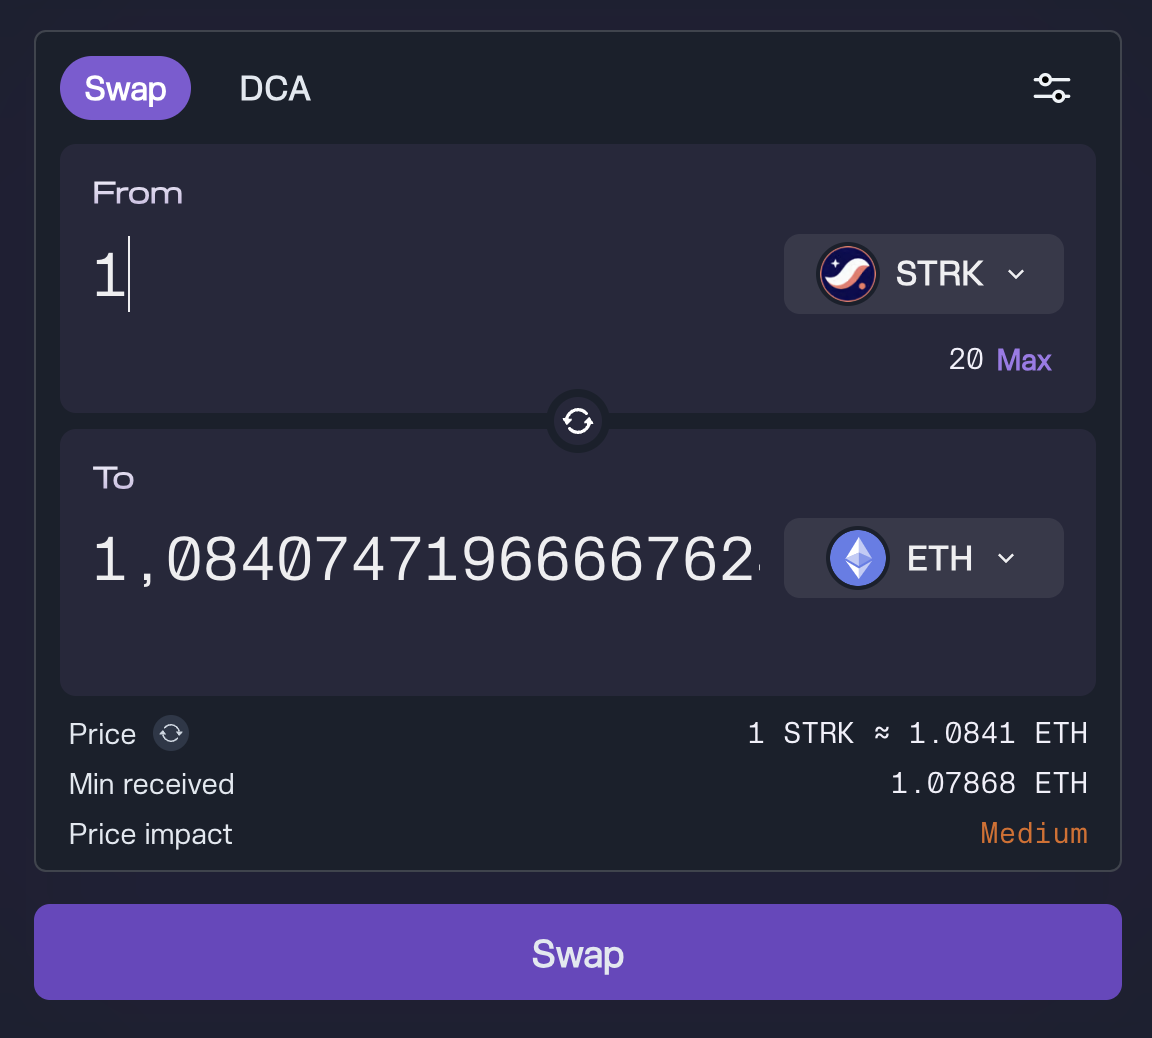
Finally, the balance update

I found this group to discuss MEV on Starknet. If you are interested in the argument, want to discuss or have some interesting information, you can find me there. Feel free to join the group.